oops! Things got crazy around here and I mailed these off before I could take a picture of them. I made several altered rolling pins for my sisters - if I was to do this again I would probably paint the entire thing and shellac over the handles as well.
Here are some instructions if you are interested. Click HERE
I wanted (needed) a place to keep track of all my little crafty projects..I do go back and use some of them over and over. So - why not a blog where I can also share them with you!
Sunday, December 25, 2011
Saturday, December 24, 2011
Reindeer Noses
Awwww.....neighbor gifts. What to do? What to do? Every year it becomes more and more competitive and hard and harder to be original. A couple years ago, I decided to simplify and do the same thing each year but with a twist. I find a Christmas story that I like and then make sugar cookies that coordinate with it.
Like many others - this time of year can be absolutely crazy and I didn't get around to making them. It came down to Dec 20 and I had to do something but it had to be easy. I googled "neighbor gifts" and found Reindeer Noses.
They are simple - whoppers, sour cherry balls, and a label. I started by making some in bowls and attaching a label to the top like this:

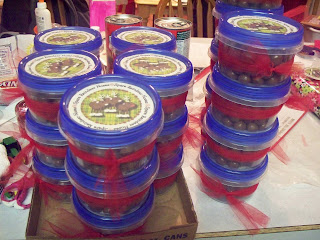 And then made some simple ones like this for their teachers. If I was to do it again, I would probably use a quart size bag for the neighbor gifts and a snack size for teachers. (forego the bowls)

Like many others - this time of year can be absolutely crazy and I didn't get around to making them. It came down to Dec 20 and I had to do something but it had to be easy. I googled "neighbor gifts" and found Reindeer Noses.
They are simple - whoppers, sour cherry balls, and a label. I started by making some in bowls and attaching a label to the top like this:


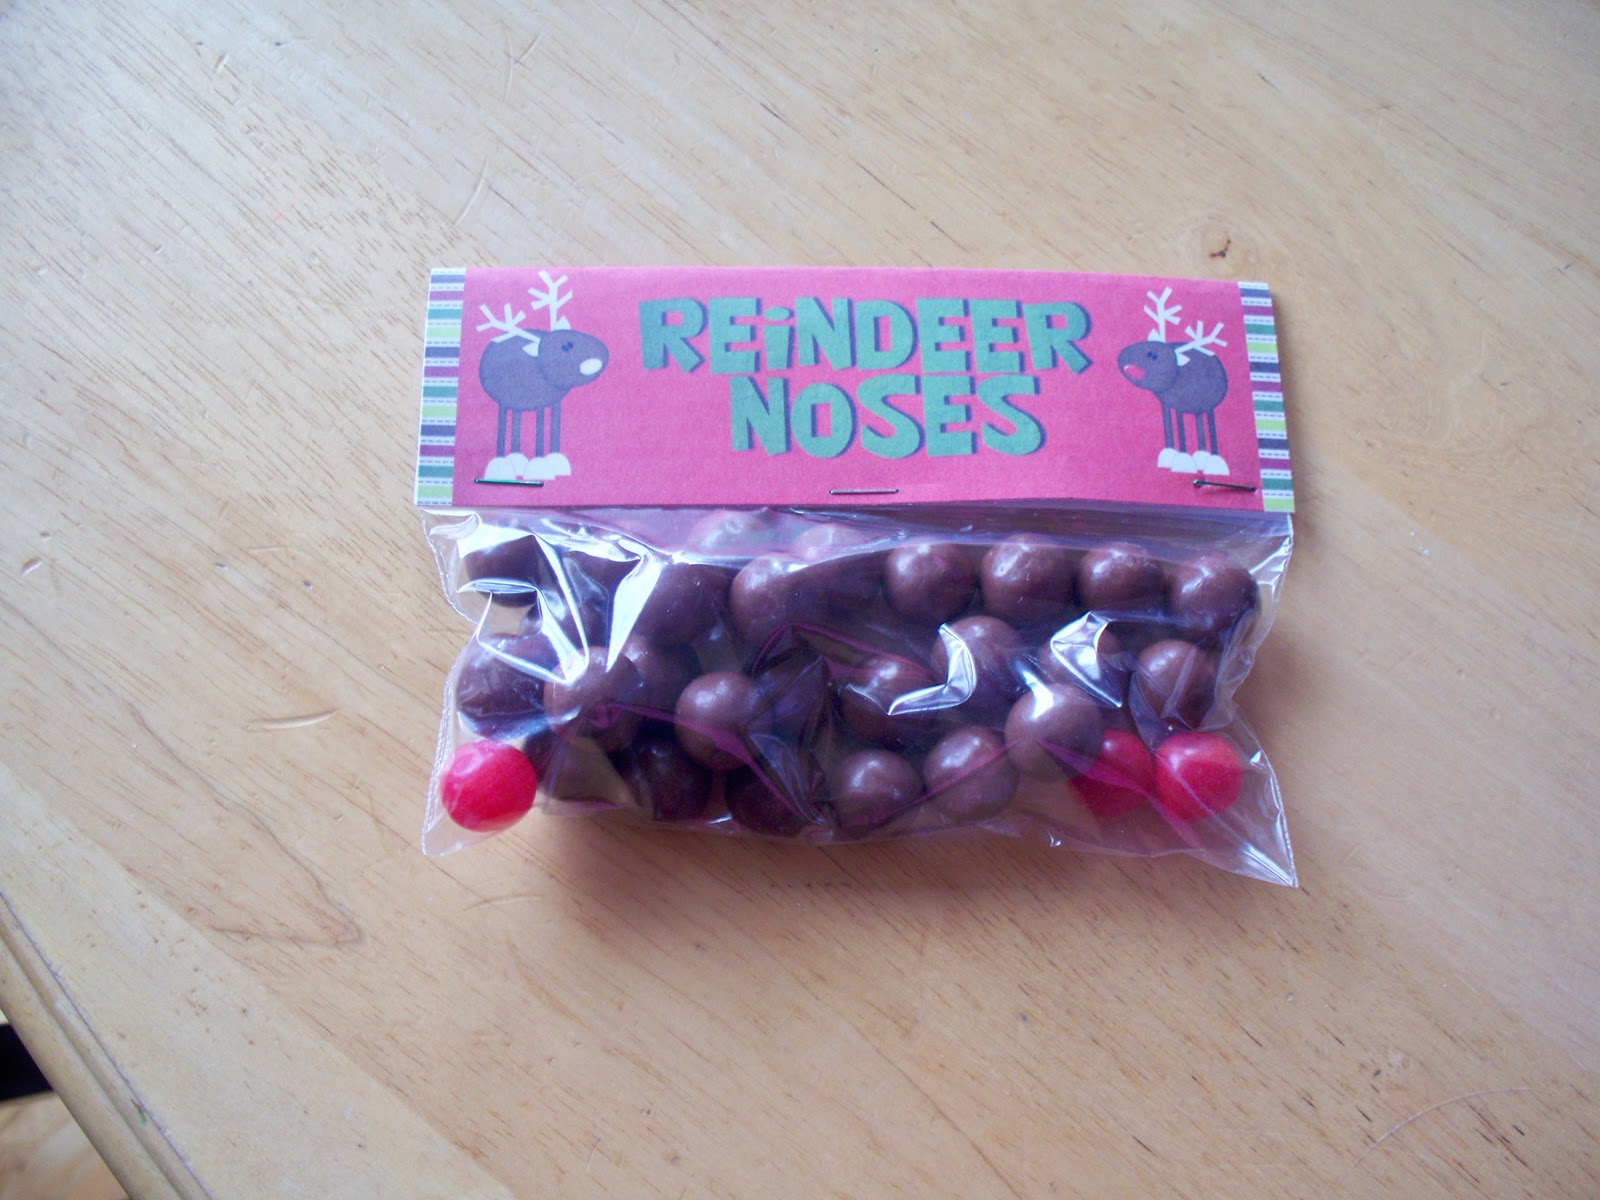
P.S. I got the cute reindeer clipart from Just So Scrappy - love her stuff!!!
Friday, December 23, 2011
Pillowcase Gift
Sunday, December 18, 2011
Gifts for Activity Day Girls
I wanted to give my Activity Day girls a Christmas gift - but with 14 girls - it had to be something small and inexpensive. I made these a couple years ago for my young women and they are super easy. I got the chapstick from Walmart - you can get 2 chapsticks for 88 cents - printed off the labels and used packing tape to apply.
I added a label that said "For beautiful lips, speak works of KINDNESS (and use chapstick)" I hope the girls liked them.

I added a label that said "For beautiful lips, speak works of KINDNESS (and use chapstick)" I hope the girls liked them.

Saturday, December 17, 2011
Christmas Stockings
MAN!! Our Christmas stockings are OLD and SCARY!! Time for some new ones - but what to do?!?! I bought some plain stockings from Dollar Tree and for Family Home Evening each one of us got to decorate one. I was going be a control freak and decorate them myself - but then I wanted them to be original and personal for them. And so - this is what we get - each one is individual to the owner and they look cute enough. (do you like how Chance didn't want ANYTHING on his stocking?)
Monday, December 12, 2011
12 Ways of Christmas

Tuesday, November 15, 2011
Wedding Gift Idea

Thursday, November 10, 2011
Thank You....
Being a volunteer coach for any sport is often an unappreciated job. I wish I had known more about flag football and I totally would have tried coaching but I know very little nothing about flag football. Our football coach was really great with the kids and I appreciate his time and effort in coaching.
 As a token of appreciation, we made him this little thank you gift and Chance gave it to him at their last game. (You may question why I give so many food gifts - it's because everyone likes to eat and I don't like clutter and don't want to add to someone else's clutter.)

Friday, November 4, 2011
Pumpkin M&M's
mmmmm...these ALMOST look good enough to eat.
I bought 5 small pumpkins - all about the same size and spray painted them different colors. I cut out vinyl with my silhouette and stuck them on the pumpkins.
P.S. I loved these SO much that I kept them up for weeks after Halloween.

I bought 5 small pumpkins - all about the same size and spray painted them different colors. I cut out vinyl with my silhouette and stuck them on the pumpkins.
P.S. I loved these SO much that I kept them up for weeks after Halloween.

Wednesday, November 2, 2011
Halloween Treats!!!
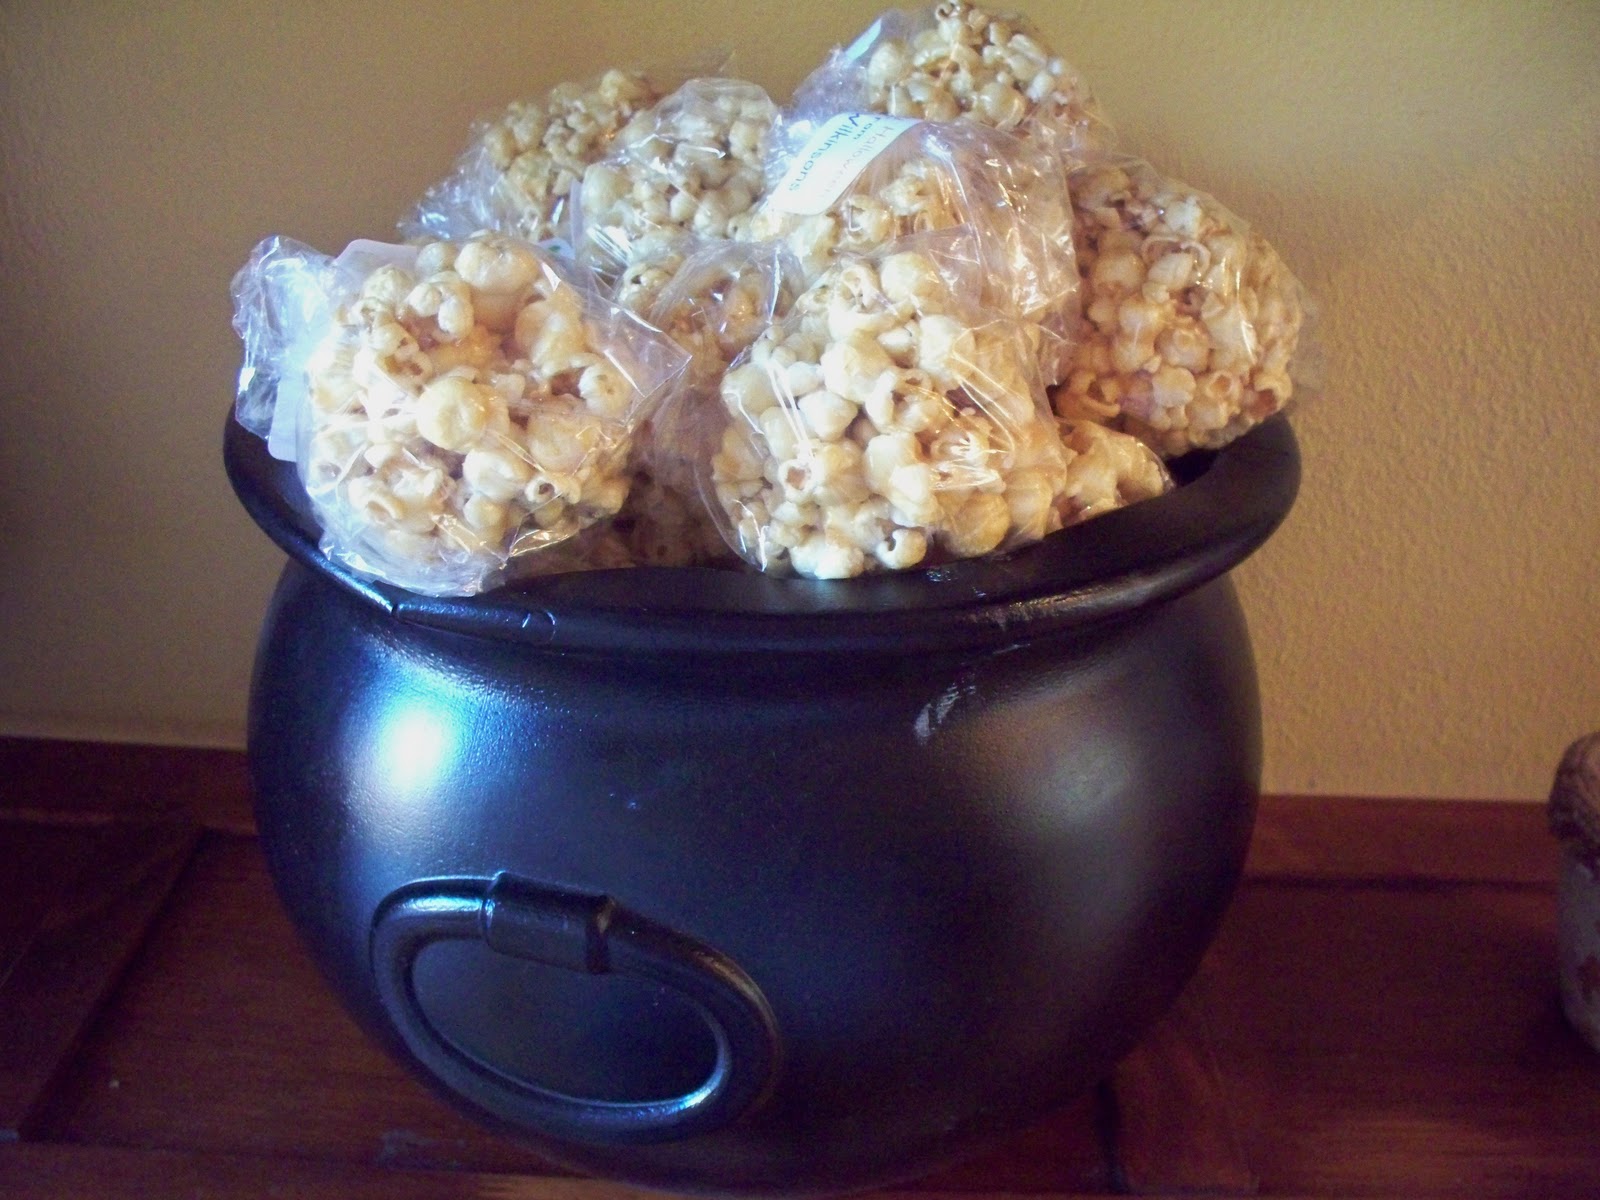
For all you "older" ladies out there - do you remember going trick or treating and coming home with all different kinds of popcorn balls? I kinda miss that tradition and so after some advice from a neighbor - I decided to tackle this one. Let's be honest - I couldn't hand out popcorn balls to ALL the kids who come to my house (I probably get close to 300) However I did make about 150 popcorn balls for my ward members and their kids.
In this day - you just don't know if you dare have your kids eat anything that is not prepackage but my friend game me an idea. I printed labels that said, "Happy Halloween from the Wilkinsons) and stuck them on each popcorn ball. That way the parents would know where they came from and just might let the kids eat them. haha.
It's funny because when we were kids - it was so exciting to get ANYTHING that wasn't homemade and now it is a treat to get something homemade. I loved seeing how excited all the neighbor kids were when they got the popcorn balls. Definitely something I will try again next year!
Tuesday, November 1, 2011
Happy Halloween!!!!
Yay!! It's Halloween! I love Halloween! I am a website stalker when it comes to crafts and this was something that I saw YEARS ago and have wanted to copy for a long time - a SLURPEE costume.
I used the following items:
2 hulu hoops (dollar store)
2 blue tabecloths
2 white tablecloths
red vinyl
rope
several yards of tulle (your color choice)
a lot of packing tape (haha)
You could use canvas fabric to make this more durable but I was wanting something cheap and so I used plastic tablecloths and just taped them up.
She was adorable - the only drawback - it was awkward to wear during school hours but still one of the most original costumes I've made.

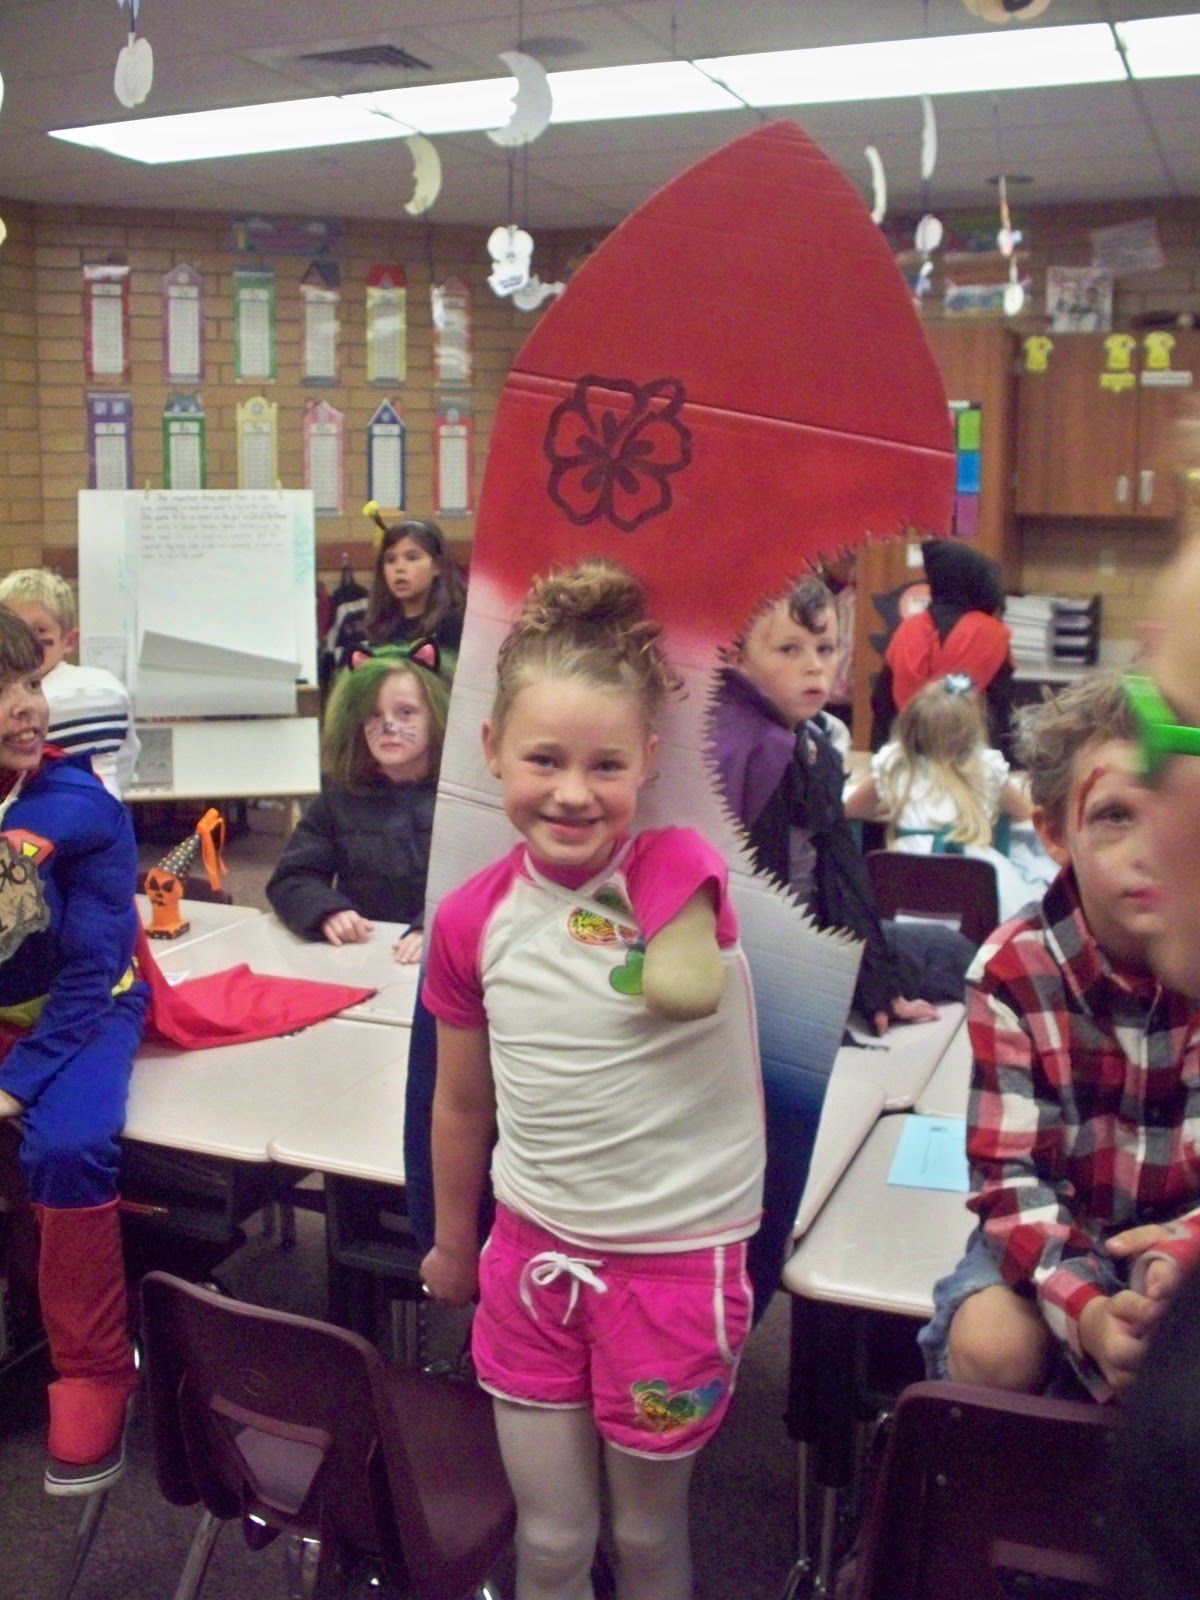
OK - and this was just an adorable costume made by a friend of mine. It's from the movie Soul Surfer. LOVED THIS COSTUME!!!
Tuesday, October 25, 2011
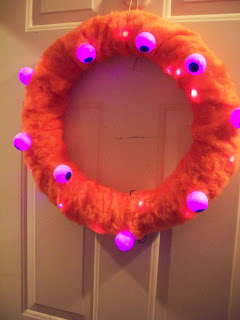
Googly Eye Wreath
Wanna hear something funny?!? I bought the supplies for this project last year and just got around to making it!! hahaha! Now I wish I had been able to find some blue fur - but orange it is!! (Oh and I'm noticing my front door really needs to be painted!!)

Wednesday, October 5, 2011
Happy Anniversary!!
My mom and dad are celebrating their 50th wedding anniversary and us 7 kids are hosting an anniversary celebration for them. My "job" was to come up with a favor to hand out. Mini candy bars and so inexpensive and easy to work with. Here's what we did:


Sunday, September 18, 2011
Fall Wreath
I was released from Young Women's in July and I am finding time to do all kinds of projects. I wanted something colorful and cute for my front door for the fall and this is what I ended up with. I love it - every time I come home I love seeing it on my front door.
Sorry for the blurry picture - I didn't realize it until I was ready to upload.

Sorry for the blurry picture - I didn't realize it until I was ready to upload.

Saturday, September 10, 2011
A gift idea for anything...
This idea is so versatile that it can be used for just about anything...birthdays, anniversaries, teacher appreciation, graduation, etc.
You can google 2 liter bottle gift ideas and find all kinds of ideas. The idea is simple - remove the original label and cut a "C" shape into the side with an knife and use the whole to put all the goodies inside the bottle. Tape the hole shut with packaging tape and cover with you custom made label.
And then wait and see how long it takes the recipient to figure out how to get inside. :)

Thursday, September 1, 2011
Back to School Teacher Treats
I saw this idea HERE and thought it would be an adorable idea for a Back to School teacher treat. I used hot tamales instead of jelly beans - they are easy enough that the kids can help make them and the teachers really loved and appreciated them.
Here's what mine looked like:

Here's what mine looked like:

Friday, August 5, 2011
Cutting Vinyl with my Silhouette
It's hard to find time to do my own projects but I was determined to mark one of my "to do" list the other day. I have been wanting to cut out something (anything) for the back window of my van. I wanted something personalized and cute.
And here's what I got. (Jeff said it reminds him of a tramp stamp - haha)

And here's what I got. (Jeff said it reminds him of a tramp stamp - haha)

Monday, August 1, 2011
Young Woman Handout
Each year at camp, we have a tradition of reading a bedtime story to the girls before bed (and this usually includes a handout). Each lady picks a book and reads their story to the girls. I picked Dr. Seuss's book called "Oh the Places You'll Go" I love that book and I especially LOVE the message.
So, for my handout - I made these colorful (and yummy) cheesecake swirl cookies. They are relatively easy to make and moist and delicious. The recipe I used can be found HERE
Here's a pic of my cookie with the tag:

So, for my handout - I made these colorful (and yummy) cheesecake swirl cookies. They are relatively easy to make and moist and delicious. The recipe I used can be found HERE
Here's a pic of my cookie with the tag:

Thursday, July 21, 2011
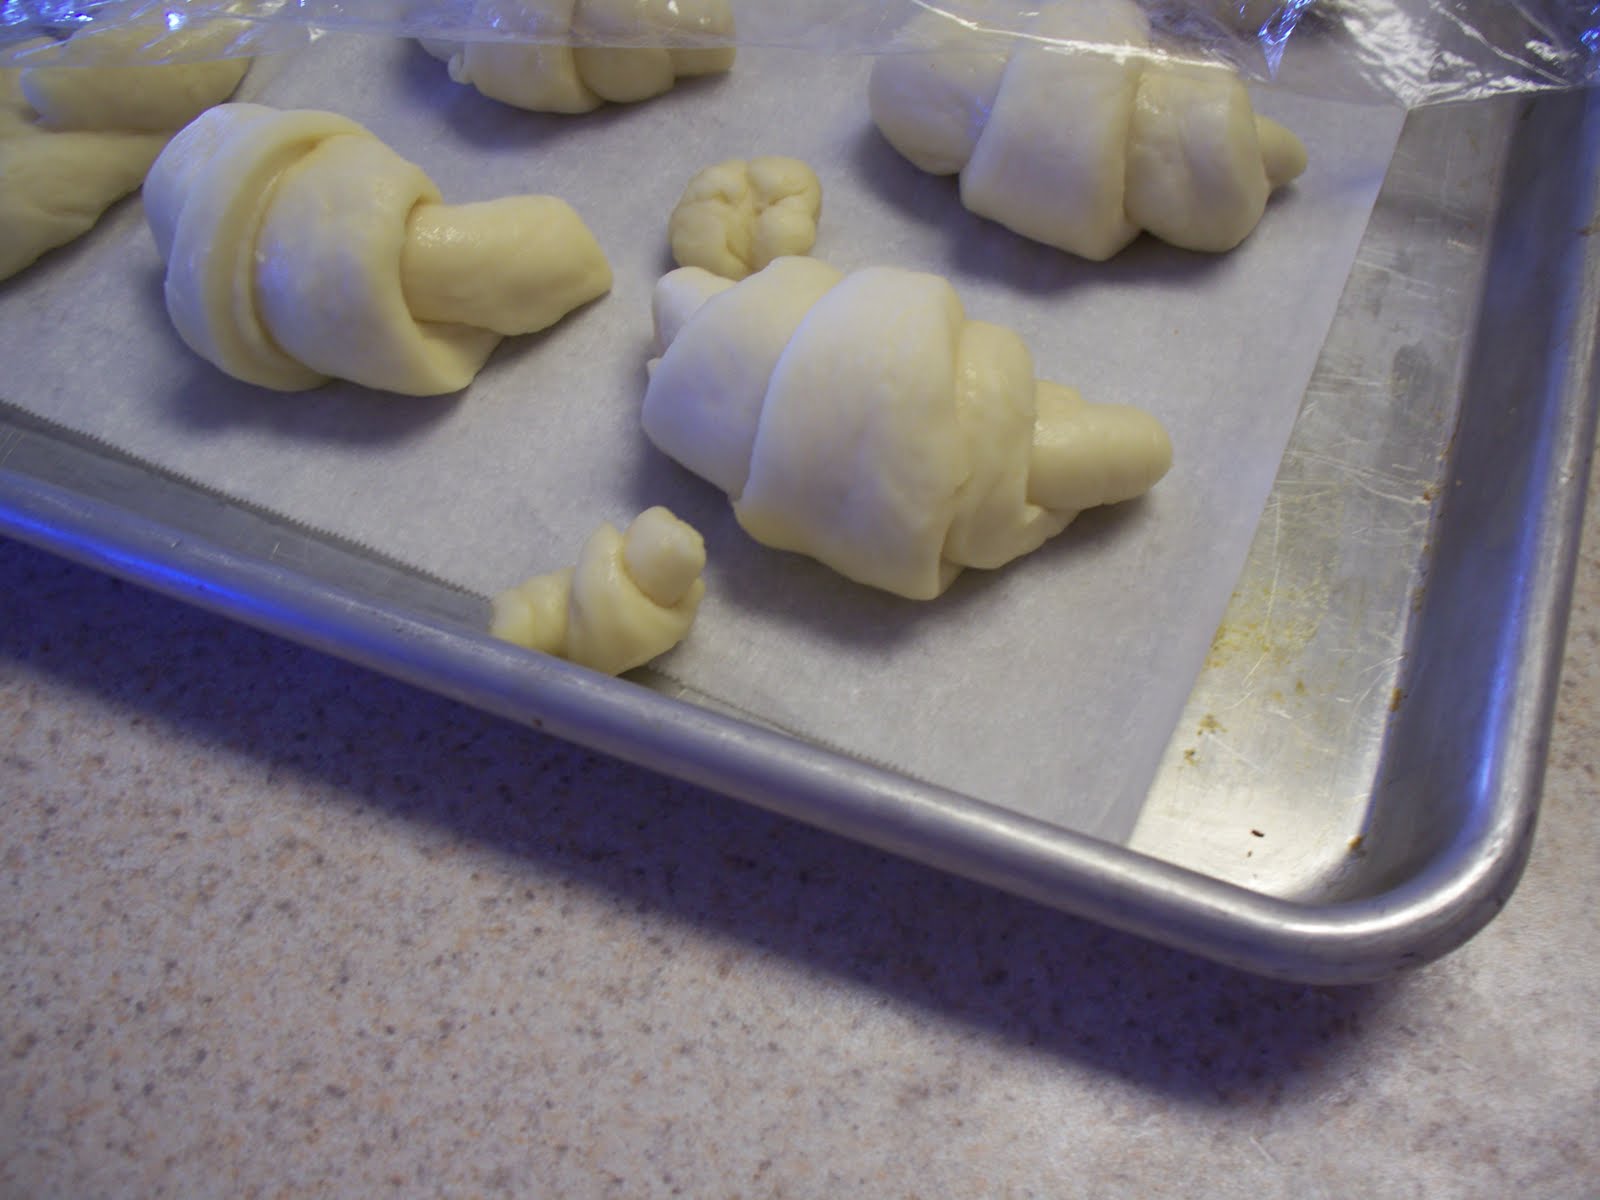
4H Cooking Class
One of the ladies in our group showed the girls how to make bread and gave them some ideas on different ways to use bread. The girls each got a HUGE chunk of bread dough and was able to try out some different ideas.
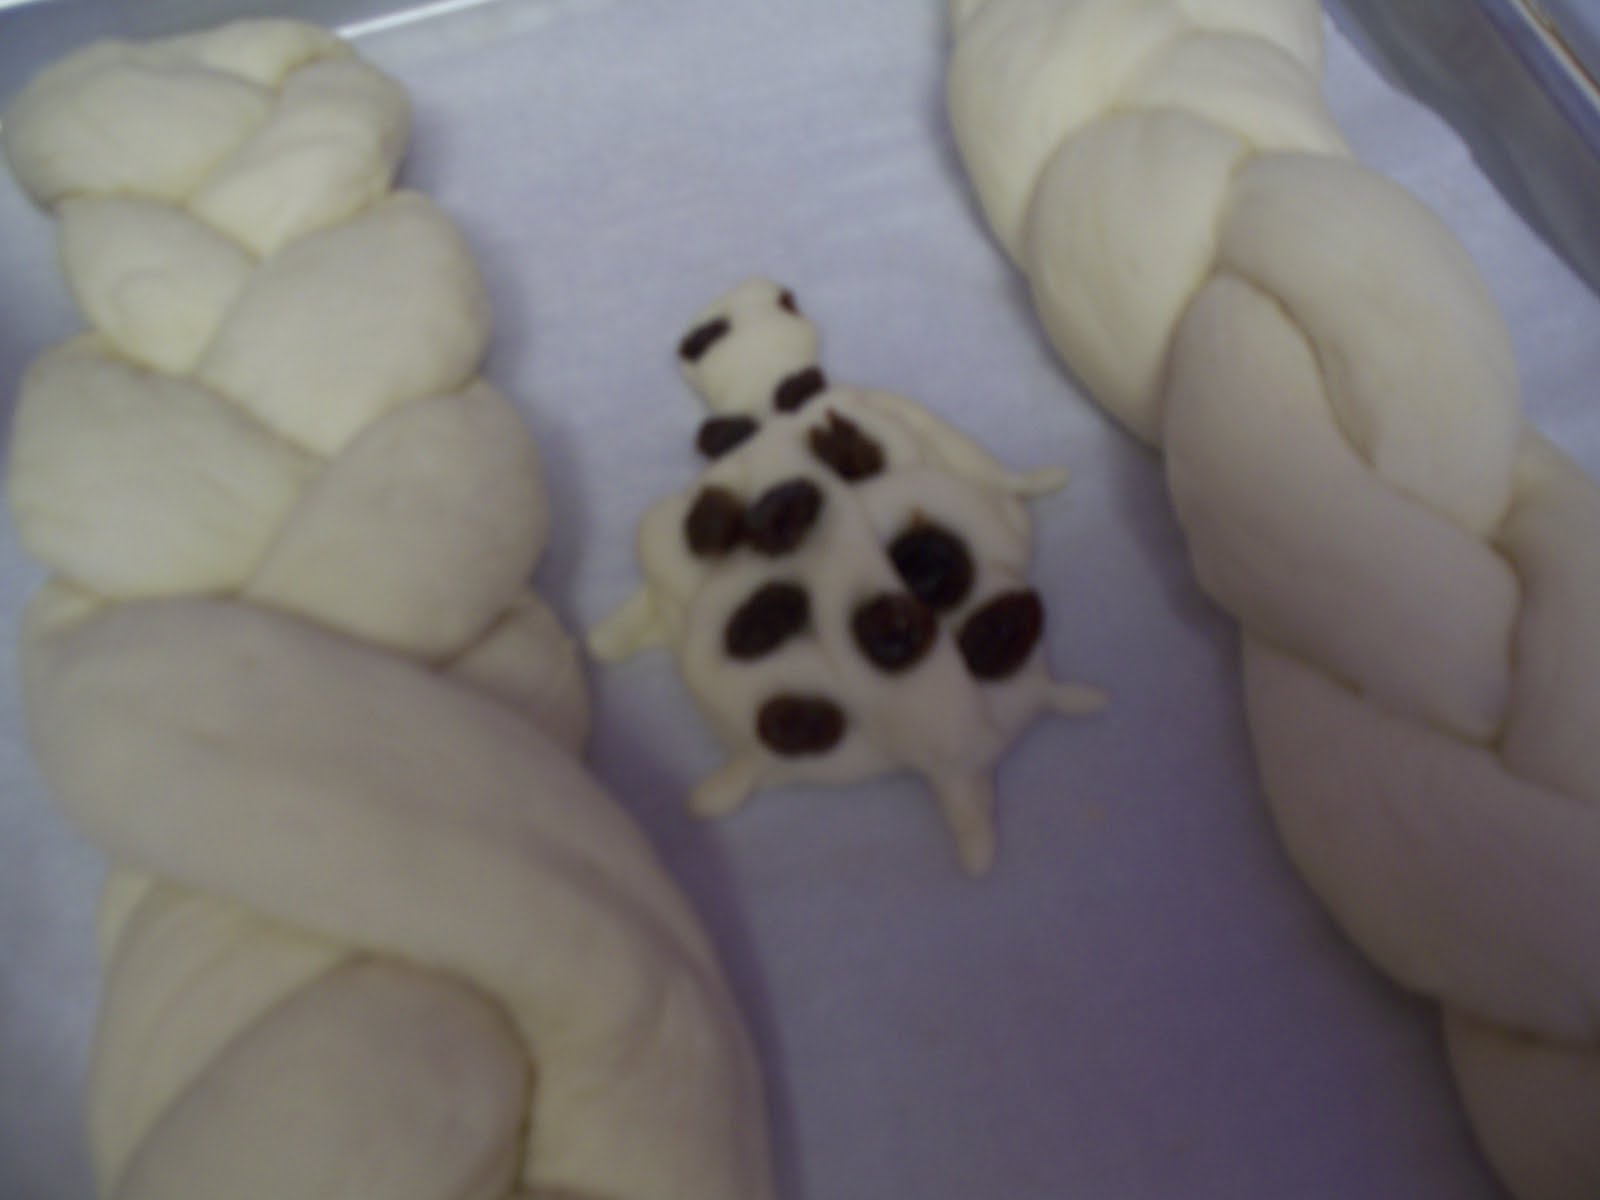
Here's a few that they came up with:

This is Hailey's tiny tiny tiny bread braid.

Hailey's snowflake

Aliya's tiny tiny tiny crescent roll (it is in front of the normal size roll)

Emily's pig

Here's a few that they came up with:
This is a turtle with raisins..and the braids were made by the girls. Cute, huh?
This is Hailey's tiny tiny tiny bread braid.

Hailey's snowflake

Aliya's tiny tiny tiny crescent roll (it is in front of the normal size roll)
Emily's pig

Friday, July 8, 2011
July 4th Shirts
Mmmm...the 4th of July kinda snuck up on me. Actually a lot of things are doing that nowadays. Haha!
It was like July 2nd and I realized that I had not thought of anything. We had made these spray paint tye dye shirts at girl's camp and I thought they would be perfect. The kids can help design and spray them.
We ended up making them on July 3rd - just in time!
I cut out their name and stars using my silhouette. I used contact paper - but you could also you vinyl. I let them apply the stickers and then we got to work spray painting. I should have taken pics - but I had my hands full with FOUR girls!!
Basically, you just scrunch up the t-shirt or twist the t-shirt and then spray paint. The kids loved making them..and here's what we ended up with.
 Jeff was worried about how they would hold up to washing and in case you're wondering - they look great. Here's a picture of Calista & Hailey's shirts AFTER being washed.
Another 4-H Project
I have 2 words for you.....Mod Podge
I can't believe that some of these girls have not even heard of Modge Podge. haha! I use it all the time and it's so much fun.
I picked a pretty easy project for the girls. I found these wood frames for $1 at Michael's Craft Store..add some scrapbook paper and you're ready to go!!
Check out how cute they are:

Monday, June 20, 2011
Father's Day
Because I can't go in to my husband's office very often (security reasons) - I don't get to keep his desk pictures up-to-date. Periodically he will say to me, hey I need some new pics - mine are getting a bit dated. It's been awhile since I gave him pics so I thought it would be perfect for father's day.
I was reminded of a Christmas card that we did a couple of years back that spelled JOY and thought I could do the same thing but spell DAD. The biggest difference is that I found a 'cool' background online and photoshopped the kids into it. hahaha!!! People have already asked me where the pic was taken and I have to laugh...
Check it out:

Wednesday, June 8, 2011
4-H Project Clothespin Dolls
Here we are with another 4-H project. I got some of these a couple weeks ago and my kids had so much fun making them. I thought they would be a really fun 4-H project. It's always so fun to see what the kids come up with. My kids have made ninjas, police officers, princesses, themselves, etc.
So, here are some examples of what can be done with clothespin dolls:


So, here are some examples of what can be done with clothespin dolls:


Wednesday, June 1, 2011
4-H Projects
I LOVED doing 4-H as a kid. I looked into it last year but couldn't find a group close to us. I debated starting one but was worried about how big it may get - I mostly just wanted to do activities with my kids. Luckily, a neighbor is familiar with 4-H and we ended up doing a small group this summer with her kids, my kids, and 2 other moms. It has been fun and we split the classes up so we each teach twice. It will be fun when we enter our stuff into the fair this fall.
So, I'm gonna take a few posts and share what we are doing for 4-H.
Our first project was candle making. We made a couple different types of candles - and the girls even got to try their hand at old fashion candle making which ended up pretty interesting. Here is a pic of the finish project!
 E
E
So, I'm gonna take a few posts and share what we are doing for 4-H.
Our first project was candle making. We made a couple different types of candles - and the girls even got to try their hand at old fashion candle making which ended up pretty interesting. Here is a pic of the finish project!
 E
E
Friday, May 20, 2011
Teacher Appreciation Gift Day 5
Well...I kinda had to scramble to get this project together. Haha - sometimes our best plans just don't work out.
I have had this idea for a week or so that I wanted my kids to make up "fortunes" for their teachers and then I was going to MAKE fortune cookies and put the fortunes inside the cookies, put them in a chinese take out bag and include a note that said, "I'm FORTUNATE to have you as a teacher." Well, we have been so busy with end of the year activities that I didn't get my kids to sit down and write fortunes until last night. And so at 10:00pm, I start making fortune cookies. They are NOT super hard to make, however they did take some time and practice on learning how to cook them just right and fold them. I went through the first batch and only had about 6 cookies that were decent. It's now 11:30pm and I have lost all motivation for this project....maybe next year. Although, I absolutely LOVED one of Chance's fortunes for his teacher. He said, "You will be haunted by cookies." So cute - wish I could have made this one work.
And so early this morning, I had my kids sit down with at the computer (thank goodness for computers!) and we came up with these. Luckily, I had the kid's class lists on hand. I thought about having them come up with words that described their teacher - but I was VERY short on time so we just used the names of all the kids in the class.
We used this website to create this project: Tagxedo
Calista's teacher gift (her teacher served a mission to Mongolia and has taught the kids alot about Mongolia. She loves the people of Mongolia so very much and it is very important to her so we made her gift in the shape of Mongolia.)
Hailey's teacher gift - the website has some premade shapes and Hailey picked a heart Chance's teacher gift - Chance's teacher LOVES music and so we used a music note. (to come)
I have had this idea for a week or so that I wanted my kids to make up "fortunes" for their teachers and then I was going to MAKE fortune cookies and put the fortunes inside the cookies, put them in a chinese take out bag and include a note that said, "I'm FORTUNATE to have you as a teacher." Well, we have been so busy with end of the year activities that I didn't get my kids to sit down and write fortunes until last night. And so at 10:00pm, I start making fortune cookies. They are NOT super hard to make, however they did take some time and practice on learning how to cook them just right and fold them. I went through the first batch and only had about 6 cookies that were decent. It's now 11:30pm and I have lost all motivation for this project....maybe next year. Although, I absolutely LOVED one of Chance's fortunes for his teacher. He said, "You will be haunted by cookies." So cute - wish I could have made this one work.
And so early this morning, I had my kids sit down with at the computer (thank goodness for computers!) and we came up with these. Luckily, I had the kid's class lists on hand. I thought about having them come up with words that described their teacher - but I was VERY short on time so we just used the names of all the kids in the class.
We used this website to create this project: Tagxedo
Calista's teacher gift (her teacher served a mission to Mongolia and has taught the kids alot about Mongolia. She loves the people of Mongolia so very much and it is very important to her so we made her gift in the shape of Mongolia.)

Hailey's teacher gift - the website has some premade shapes and Hailey picked a heart
 Chance's teacher gift - Chance's teacher LOVES music and so we used a music note. (to come)
Thursday, May 19, 2011
Teacher Appreciation Day 4

Today we are gonna sweeten up the teacher with some candy. I found out the teacher's favorite candy and we made these candy sundaes. They are so easy - the kids helped make most of them.
You will need a sundae glass, a styrofoam ball to fit on the glass, packaging tape (heavy duty), and lots and lots of candy!! We started by placing some candy into the sundae glass and then we used the packaging tape to tape the styrofoam ball onto the glass. I placed the "straw" into the ball so I knew where it would be and could work around it. Then we just started at the bottom and worked our way around and up the ball. We used the packaging tape to adhere the candy. I tried using a stapler because I thought it would be easier to just pull off one candy at a time but that didn't work so well. I might if you have the green ball but I was using the white styrofoam ball. Tape you cherry cordial on top and you are ready to go!
The teachers absolutely loved these and the kids had a great time making them.

Estimated cost:
Sundae dish $1 (gotta love the dollar store)
styrofoam ball $1 (again the dollar store)
candy $7 (depends on if you use one kind or several)
Total Cost is about $10
Wednesday, May 18, 2011
Teacher Appreciation Day 3
I really wanted to do some projects that my kids could help with. I wanted them to draw a picture or write something on a glass plate using etching cream - HOWEVER - my oldest daughter asked if we could use an image from the computer and then all THREE kids wanted to. And so that's what we did - I let them design the plate, help apply the vinyl to the plate, and apply the etching cream.
I used my silhouette to cut out the images...be sure to reverse the image so you can apply it to the bottom of the plate.
Calista's plate (her teacher loves to golf)
 Hailey's teacher loves baseball - it is also her classroom theme
 Chance's teacher uses knights, princesses, dragons, etc as her classroom theme. Chance wanted a dragon and simply wanted a plate that said "Thank You"..haha..here is his plate.
 And a cost breakdown for this project per plate:
Glass Plate -$1.50
Etching Cream -FREE (I had this at home however a bottle would cost approx $6.00
Vinyl -FREE (I also had this at home)
Total Cost -$1.50
I used my silhouette to cut out the images...be sure to reverse the image so you can apply it to the bottom of the plate.
Calista's plate (her teacher loves to golf)
 Hailey's teacher loves baseball - it is also her classroom theme
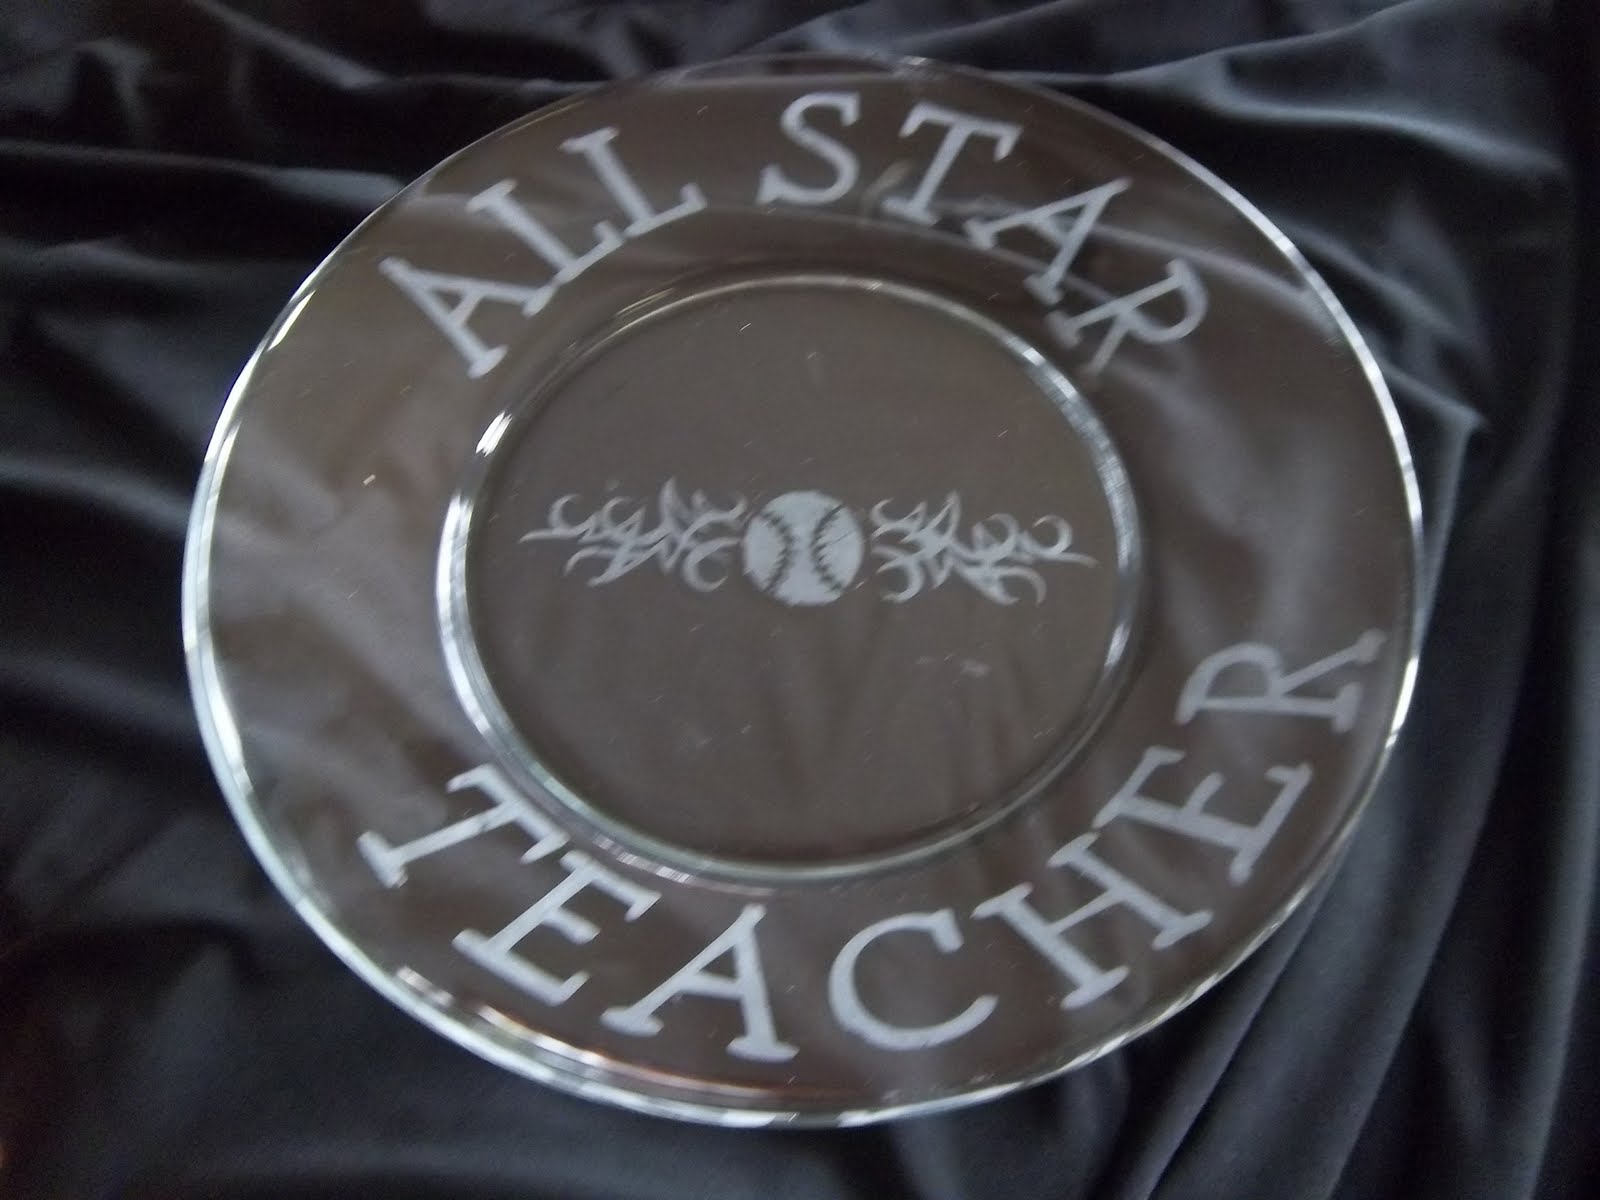 Chance's teacher uses knights, princesses, dragons, etc as her classroom theme. Chance wanted a dragon and simply wanted a plate that said "Thank You"..haha..here is his plate.
 And a cost breakdown for this project per plate:
Glass Plate -$1.50
Etching Cream -FREE (I had this at home however a bottle would cost approx $6.00
Vinyl -FREE (I also had this at home)
Total Cost -$1.50
Tuesday, May 17, 2011
Teacher Appreciation Gift Day 2
I have modge podged clipboards in years past but I saw a blog where someone posted that they had found these at Target and decided that it was worth it to buy them ready made and then add the vinyl to personalize them.
Way way easy project!!
Personalized Clipboard with matching pencil holder and pencils And here is the cost breakdown for this project:
Clipboard -$1.00
Pencil Holder -$1.00
Pencils -$1.00
Vinyl -FREE (I already had this at home)
Total Cost -$3.00
Way way easy project!!
Personalized Clipboard with matching pencil holder and pencils
 And here is the cost breakdown for this project:
Clipboard -$1.00
Pencil Holder -$1.00
Pencils -$1.00
Vinyl -FREE (I already had this at home)
Total Cost -$3.00
Another Teacher Appreciation Door
Well...after setting up Friday afternoon...I was pretty sure that I would need to do at least ONE more door. I ended up doing one more door and helping with another.
So, here is the door that I did for the nurse:

And here is the door that I helped with. It is for our school facilitator.
So, here is the door that I did for the nurse:
And here is the door that I helped with. It is for our school facilitator.

Monday, May 16, 2011
Teacher Appreciation Gift Day 1
I know I am not a room mom this year - but I usually am and so I out of habit I sent a gift for the teacher each day of the week. I LOVE my kids teachers and this is a great week to show how much we appreciate them. Like many others, I find many of my ideas online....here's what we did this year:
Post It Note Holder with personalized pens


These are pretty simple and easy to make although it took me a while to find the 5x7 acrylic horizontal frame. I made the design on the computer but I've seen people make them with scrapbook paper and they are darling as well.
Sometimes I see an idea and decide to make it and then find that it cost more than I thought so this year I'm gonna post how much it project cost so I can decide if it is something that I want to do again.
Post It Note Project
5x7 acrylic frame (Hobby Lobby) - 2.47
Scrapbook Design - FREE
Post It Note - $1.00
Pens (Walmart or Dollar Tree) -$1.00
Paper for inside pen - FREE
Total Cost Approx $3.47
Friday, May 13, 2011
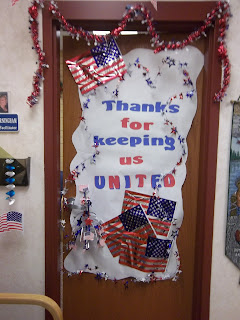
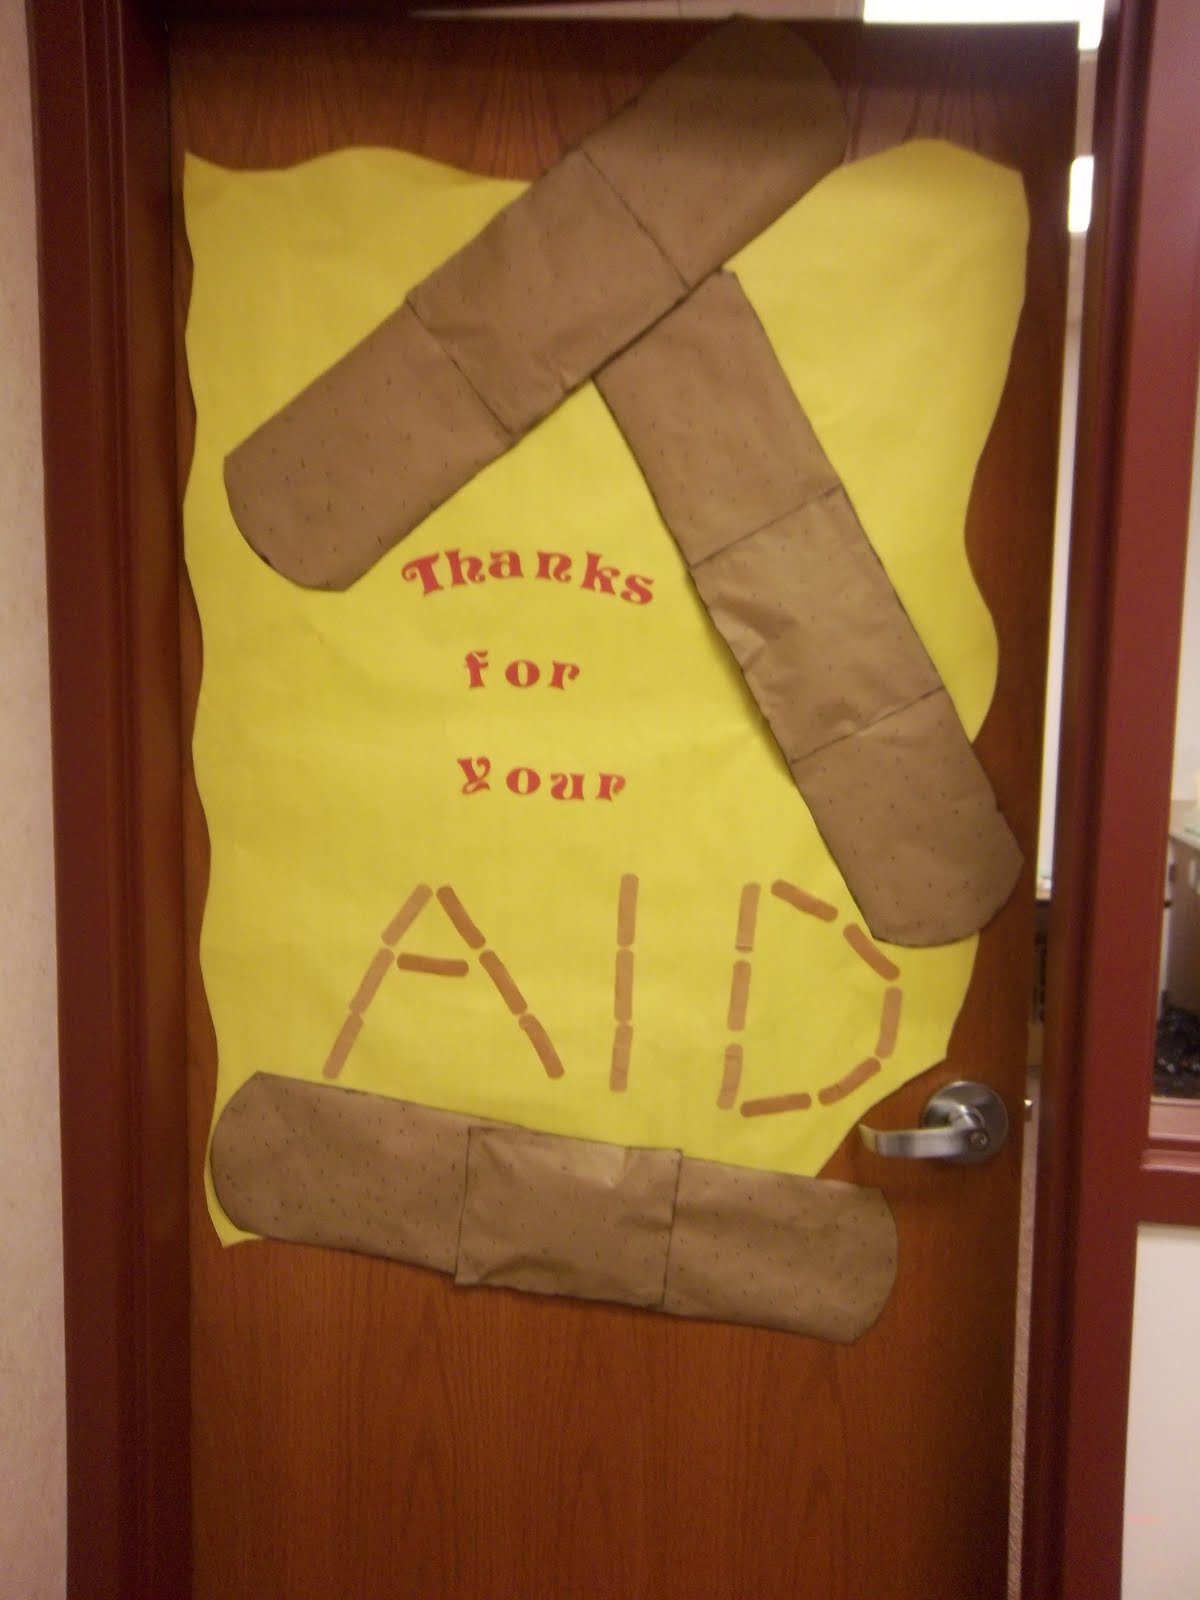
Teacher Appreciation Doors
Whew!! So, lucky me got roped into not 1....not 2....not 3...but FOUR teacher appreciation doors!! We have 18 "extra" doors and we TRIED and TRIED to get volunteers to help and we did get a few but we still ended up with 9 doors between me and the PTA President...so discouraging that out of 800 students we can't get 9 moms to help with one activity...sigh....BIG SIGH.
Anyway, we split the rooms up and here's what I did..remember I had FOUR doors to do so they are nothing spectacular. (OH...and I should mention that we are currently short 2 doors..so I may be doing 2 more this weekend..sigh..BIG SIGH...BIG BIG SIGH!)

This is for the school psychologist..I don't even know his name.haha.

 So...you can't really tell in the picture but I made puffy paint by mixing shaving cream and Elmer's glue. I dabbed it onto the paper using a sponge brush and let it dry. Then I inked the edges with yellow and brown paint and lightly painted some of the puffy paint. If you click on the picture and enlarge it..you can see it better.
 And finally...here is the door that I did for the lunch ladies...oh..but it is not on the door. We started encouraging the use of the walls next to the doors because some room moms have gone so overboard on the door that it won't open or close properly. HAHA! And some doors have been damaged so I put this one on the wall..It's the thought that counts, right!?!

Anyway, we split the rooms up and here's what I did..remember I had FOUR doors to do so they are nothing spectacular. (OH...and I should mention that we are currently short 2 doors..so I may be doing 2 more this weekend..sigh..BIG SIGH...BIG BIG SIGH!)
This is a door that I did for the ART teacher. It is a poster size "box" of crayons..

This is for the school psychologist..I don't even know his name.haha.

This is the door for the principal..got the idea from another website..and got the idea for the popcorn from a card found HERE...the popcorn is "puffy"..see next picture
 So...you can't really tell in the picture but I made puffy paint by mixing shaving cream and Elmer's glue. I dabbed it onto the paper using a sponge brush and let it dry. Then I inked the edges with yellow and brown paint and lightly painted some of the puffy paint. If you click on the picture and enlarge it..you can see it better.
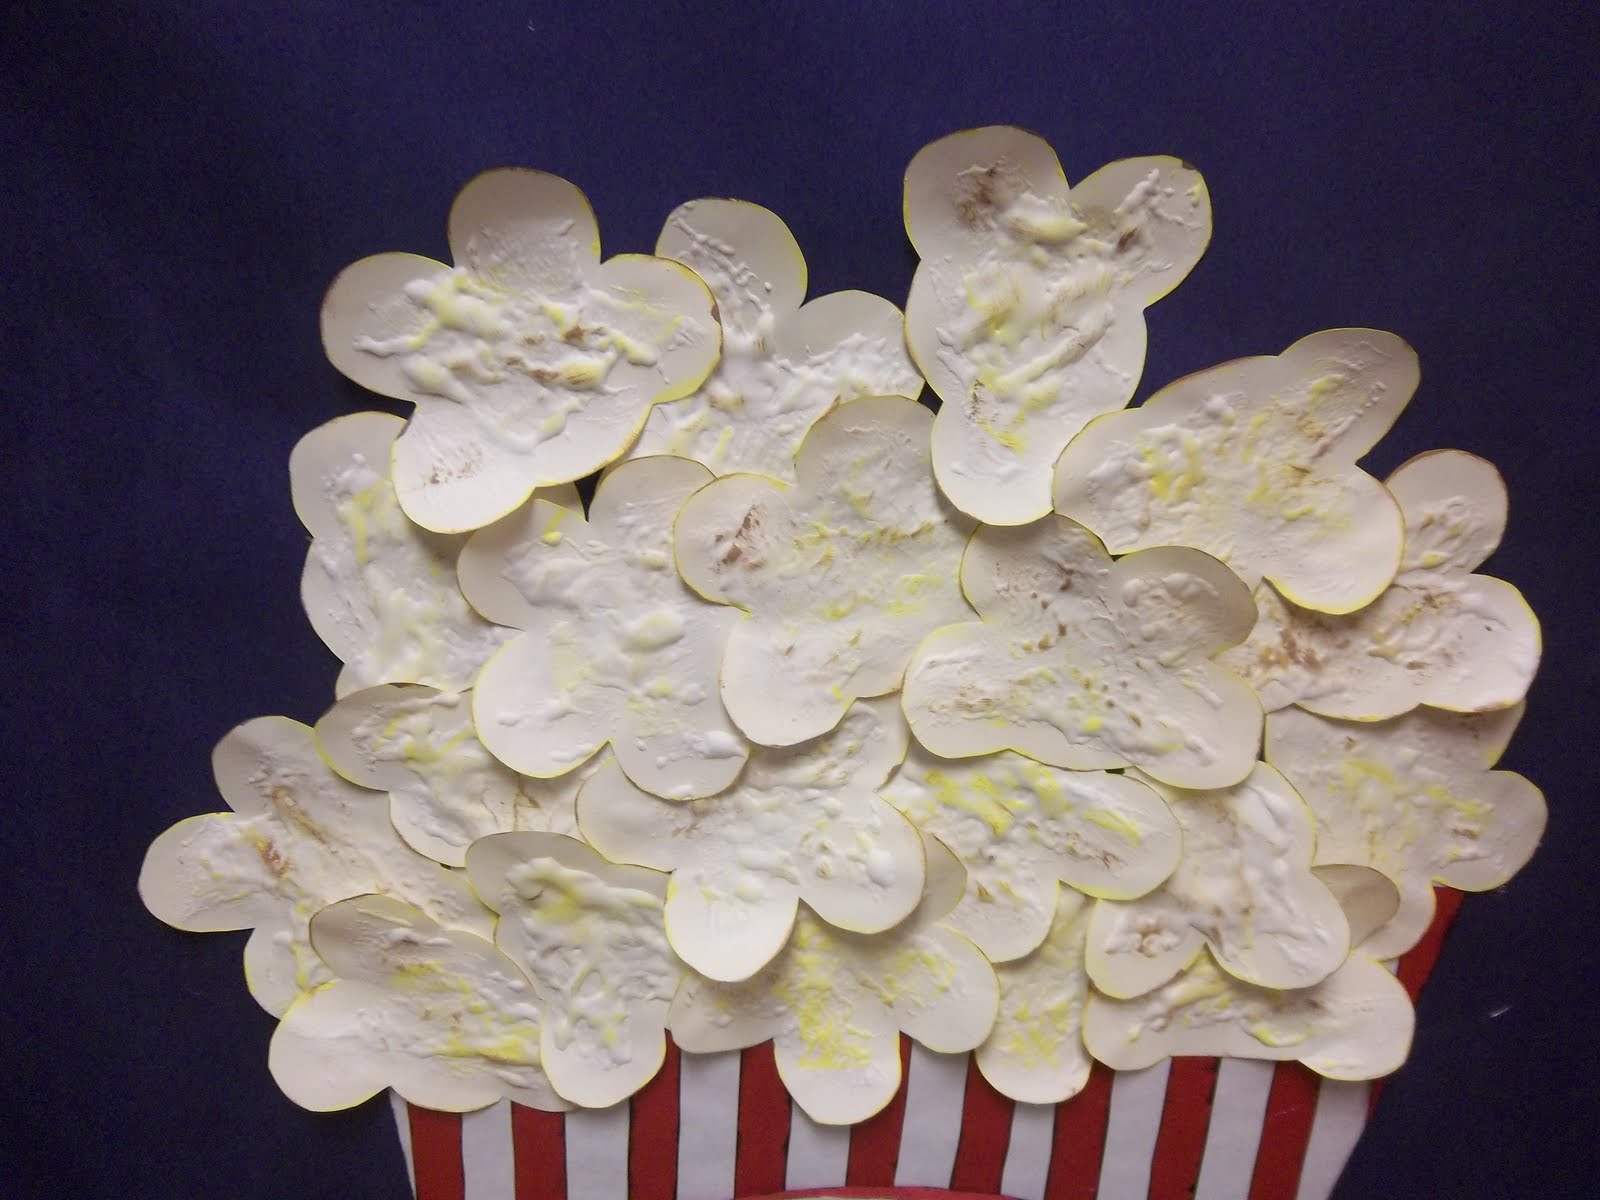 And finally...here is the door that I did for the lunch ladies...oh..but it is not on the door. We started encouraging the use of the walls next to the doors because some room moms have gone so overboard on the door that it won't open or close properly. HAHA! And some doors have been damaged so I put this one on the wall..It's the thought that counts, right!?!
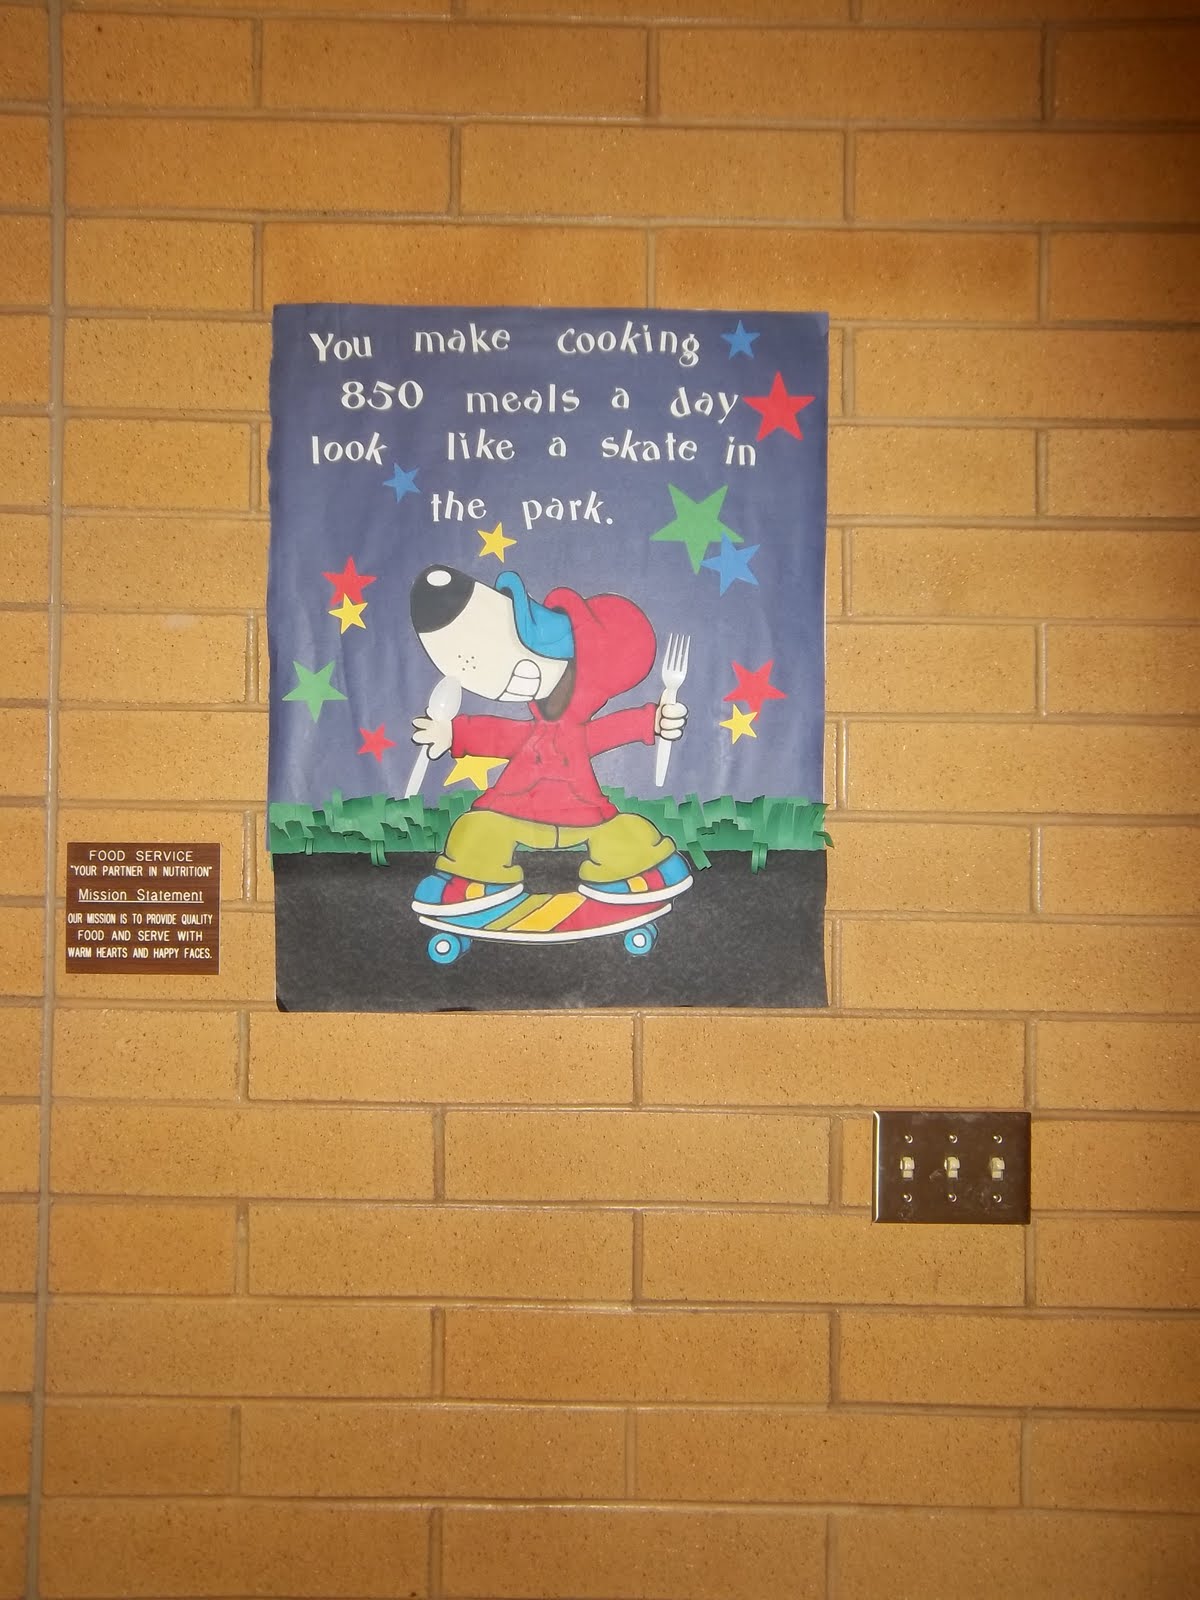
Subscribe to:
Posts (Atom)