Showing posts with label crafts. Show all posts

Saturday, January 15, 2011

YW Room

I looked around our Young Women room one Sunday as we were preparing to start and thought, "This room is very drab and does NOT reflect how bright and beautiful our young women are." Something must be done..hahaha!

We have a bulletin board in the front of the room and it had not long since been forgotten. There were several flower bouquets on the piano but their colors were a bit drab. (no offense to anyone out there!)

I wanted to see some color and energy in this room. Just so you know - I didn't take over the room - I did call the other YW presidents and make sure they were OK with changing things up a bit..and who wouldn't be - as long as they didn't have to do the work..hahaha!

Anyway - this isn't my best work - but it sure does brighten the room up.

I'm still a little unsure about the flower bouquet - but I tried a couple of things and nothing seemed to work - it looked very bare. Then I had the idea of gathering some branches from the park (the city had thinned out the trees and left the branches on the ground). I spray painted them black and glued my paper flowers onto them. It's not the best - but it's the best that I could on my budget with was NOTHING!! :)

I got the back picture frame from Walmart for $10. It was perfect with eight openings..one fore each young women value - how did I luck out?

Sunday, August 22, 2010

Back to School Party

Wow!! It's hard to believe that it's time for the kids to go back to school!! The summer just FLEW by for us!!

Well, the girls wanted a back to school party so we thought up a few projects and invited the neighbor girls over..we ended up with about 14 girls.

We ended up making:
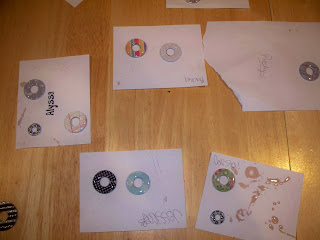
1) washer necklaces I was going to just let the girls modge podge them on and call it good but couldn't do it. They really do look so much better with the epoxy on them. So the girls glued on the paper and I put on the epoxy and we delivered them to the girls 2 days later

2) Back Pack Tag - Just used excess scrapbook paper and the clear badge protectors than can be found in the office dept at Walmart. I also printed out each girl's name so they could either use the typed name or write their own name on it. I found some colored key rings and they used those to attach them to their back packs.

3) Bubble Rings - I found a kit at Shopko that had EVERYTHING you needed. It was only $4.79 for 10 rings. I thought they would be a lot of fun - they looked cute but I have heard that a couple of the girls have broken. The paper on the back of the bubble rips and does not stay adhered to the ring. BUMMER! I think I could probably fix this for future rings by adding a coat of crystal accents to the bottom of the paper before gluing onto the ring.

4) Personalized Pens - I bought some cheap pens from Walmart. The kind that have the top that screw off. I had typed up their names and they could choose between their name or patterned paper.

So after all the crafts were done, the girls went downstairs and watched a movie. I think I overkilled on the popcorn - THREE different kinds. (Screaming Yellow Zonkers, Caramel Corn, and Marshmallow popcorn)

Anyway - it was a lot of fun. I hope the girls had as much fun as I did planning it!


A picture of some of the washer necklaces. I had the girls write their name on a piece of paper so I knew whose was whose.

Here's a pic that shows one of the back pack tags, washer necklaces, the rings, and the pens.
Goody bags all tied up and ready to go. I got them ready while the girls were watching their movie.

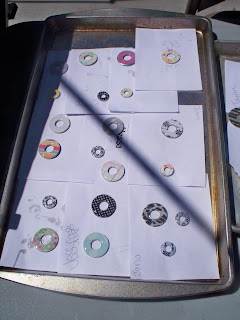
Necklaces drying in the sun...I had to take this picture just in case the wind blew them off the paper - so I would know whose was whose. And guess what - they did blow off and I had to used the picture.

Friday, August 20, 2010

Baby Gifts

Seems like I have had a ALOT of babies being born in our ward...6 babies within a 2 month period to be exact.

My neighbor (CaraDee) and I made these adorable baby gifts for the women in our ward. We saw this somewhere on the internet and LOVED the idea. I LOVE the song "I am a Child of God" and if fits perfectly.

We were not able to get baby pictures for all the new babies so we used a picture of Christ holding a baby's hand for some of the gifts.

Six babies and only 2 of them were girls...

A close up of Dylan's

A picture of all SIX...and of course we HAD to make them all different (just because)

Thursday, April 1, 2010

April Fools

I love April Fools Day!!! I got the idea for the spilled drink idea from Family Fun..click HERE: My kids made these for their teachers. They took a good 3 days to dry. It really scared one of the teachers!!


I also found the template for these on Family Fun. I had to modify it a bit to make the end longer so that I could crimp the edges. Click HERE for the template. I wrapped them around a package of Reeces Pieces. The kids gave these to their teachers who absolutely loved them!!!

I didn't take a picture but another good prank was to glue a magnet to the bottom of a cup and put it on the top of your vehicle and then watch all the people try to get your attention. My kids laughed all the way to school with this one.

Saturday, December 5, 2009

My First Attempt At Skirts

I've had this idea for years about making a skirt using the rag quilt technique. I FINALLY got around to making one. I bought some cheap material and made the green and red skirts.

I used wonder-under to apply the material onto the shirts. It's available at all fabric stores and truly is a WONDER!! I have also used it to apply fabric cutouts onto wood.


S0, after making my "trial" skirts - I found some cute Christmas material and made some Christmas skirts. I also made a tie for Chance.

Thursday, September 6, 2007

Old Old Craft

This is a project that I made several years ago for some wonderful sisters that I was serving with in the Relief Society Presidency. I purchased scrapbook paper and then designed my quote and printed it onto the paper. I found these 5x7 wood plaques at Walmart for less than $1. I painted them and then applied the paper using Modge Podge.

Friday, April 7, 2006

Statue of Liberty

I have to share this because it is so HILARIOUS!!
Calista had to make a 3d project based on the Statue of Liberty. Luckily, we had this old Barbie that we painted green, made the crown out of chenille stems, and torch out of a paint sponge brush. It was a hilarious and fun project.