Sunday, June 21, 2009

Forgiveness Flour


I made these for a lesson that I taught about Forgiveness. I used regular tea towels from the $1 store and cut them into a rectangular shape. I used iron-on transfers for the wording (pdf coming soon). Then I stuffed them with pillow batting and tied them shut with ribbons. I wish I had made a pocket on the back to hold a copy of the poem...maybe next time.

Forgiveness Flour

When I went to the door, at the whisper of knocking,
I saw Simeon Ganter's daughter, Kathleen standing
There, in her shawl and her shame, sent to ask
"Forgiveness Flour" for her bread. "Forgiveness Flour,"
We call it in our corner. If one has erred, one
Is sent to ask for flour of his neighbors. If they loan it
To him, that means he can stay, but if they refuse, he had
Best take himself off. I looked at Kathleen..
What a jewel of a daughter, though not much like her
Father, more's the pity. "I'll give you flour," I
Said, and went to measure it. Measuring was the rub.
If I gave too much, neighbors would think I made sin
Easy, but if I gave too little, they would label me
"Close." While I stood measuring, Joel, my husband
Came in from the mill, a great bag of flour on his
Shoulder, and seeing her there, shrinking in the
Doorway, he tossed the bag at her feet. "Here, take
All of it." And so she had flour for many loaves,
While I stood measuring.
Marguerite Stewart

Saturday, June 6, 2009

YW Handout

This is a handout that I did for a YW lesson about finding JOY in our lives. I have used this technique in the past to cover all kinds of treats - Hershey Stix, M&M's, etc.

Depending on what you are covering, you will need to measure the distance around and the length of your item. Be sure to add a little extra for overlapping the edges. Design your project using your program of choice (I use Printshop)

Once the item has been printed and cut out - use a double sided tape runner and apply the tape to the long side as well as the 2 end pieces. Now you can you can wrap it around your item and secure with the tape. Be sure to position the item where you want it before securing the 2 ends.

Once you have secured the ends, use a paper crimper to crimp the edges. You can leave it here or you can use a zig zag pair of decorative scissors and trim the edge.

TA DA - you are done!!


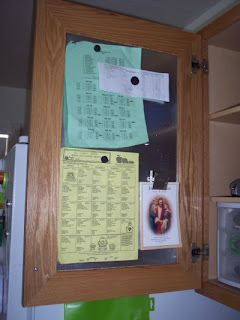
Magnetic Cupboards

I don't really care for all the magnetic clutter that seems to appear on my fridge and my kitchen does not have a space for a magnetic board. So, I was trying to figure out how to fix this problem and I thought, "Why not put sheet metal on the inside of my cupboards? Then I can close them and no one can see all the papers."

I measured the recessed portion of my cupboard and had a place here in town cut them to theright size for me. Then I had my DH remove the cupboard fronts and I glued them in using E-6000 glue. I rested a whole pile of books on top and left it over night to dry. My DH installed them the next day and I put them right to work!!
Needless to say, I have LOVED this idea. I might add it to a few more!!

Monday, June 1, 2009

Camp Hats

Our theme for camp last year was "SHINE" and was focused on the stars. We headed up to the mountains in early June and knew that it may be a little chilly at night and in the mornings. We made these cute hats for our YW along with a SHINE pin that could be pinned to their hat hat or their shirt..whatever they chose.
The girls loved them! They all looked so adorable in them!!!
Remember this idea from a previous post...they are a perfect craft for girl's camp.


Each of us leaders took a day and made a handout along with a goodie for the girls. I used Starburst and attached a quote that said, "We can't all be STARS, but we can all TWINKLE."